
Every 30000 miles you should – Every 30,000 miles, your vehicle requires specific maintenance to ensure optimal performance and longevity. This comprehensive guide will provide a detailed overview of essential maintenance tasks, empowering you to keep your vehicle in top condition.
From tire rotations to fluid changes, we’ll cover every aspect of the 30,000-mile maintenance schedule, ensuring your vehicle remains safe, reliable, and fuel-efficient.
Vehicle Maintenance Schedule
Maintaining your vehicle is crucial for ensuring its longevity and safety. Following a regular maintenance schedule helps prevent costly repairs and breakdowns, and extends the life of your car.
Neglecting maintenance can lead to severe consequences, such as reduced fuel efficiency, increased emissions, and potential safety hazards. By adhering to the recommended maintenance intervals, you can avoid these issues and keep your vehicle running smoothly.
Maintenance Tasks and Intervals
| Task | Interval |
|---|---|
| Oil and filter change | Every 3,000-5,000 miles |
| Tire rotation | Every 5,000-7,500 miles |
| Brake inspection | Every 10,000-12,000 miles |
| Spark plug replacement | Every 30,000-60,000 miles |
| Transmission fluid change | Every 30,000-60,000 miles |
Tire Rotation and Alignment: Every 30000 Miles You Should

Proper tire rotation and alignment are essential for extending the life of your tires, improving handling, and ensuring a safe and comfortable ride. Regular maintenance of these aspects can save you money and prevent unnecessary repairs.
Tire rotation involves systematically moving each tire to a different position on the vehicle to ensure even wear and tear. This is important because tires wear differently depending on their position on the vehicle. For example, front tires typically wear faster than rear tires due to steering and braking forces.
Tire Rotation Procedure
- Park the vehicle on a level surface and engage the parking brake.
- Loosen the lug nuts on all four tires, but do not remove them completely.
- Jack up the front of the vehicle and place jack stands under the designated jack points.
- Remove the front tires and place them in the rear positions, crosswise (i.e., left front to right rear, right front to left rear).
- Jack up the rear of the vehicle and place jack stands under the jack points.
- Remove the rear tires and place them in the front positions.
- Tighten the lug nuts on all four tires to the manufacturer’s specified torque.
- Lower the vehicle and remove the jack stands.
It is generally recommended to rotate tires every 5,000 to 8,000 miles or as per the manufacturer’s guidelines.
Importance of Proper Tire Inflation
Maintaining proper tire inflation is crucial for tire life and overall vehicle performance. Underinflated tires can cause uneven wear, increase rolling resistance, and reduce fuel efficiency. Overinflated tires can lead to reduced traction, increased braking distance, and a rougher ride.
Check tire pressure regularly using a tire pressure gauge and adjust it to the manufacturer’s recommended level, which can be found on the vehicle’s door jamb or owner’s manual.
Brake Inspection and Replacement

Brakes are essential for vehicle safety. Worn brake pads can reduce braking performance, increase stopping distances, and lead to costly repairs. Knowing the signs of worn brake pads and how to inspect and replace them is crucial for maintaining vehicle safety and performance.
Signs of Worn Brake Pads:
- Squealing or grinding noises:Worn brake pads often produce a high-pitched squealing or grinding noise when applied.
- Reduced braking performance:Noticeably longer stopping distances or reduced braking power may indicate worn brake pads.
- Vibrations in the brake pedal:Excessive vibrations in the brake pedal during braking can be a sign of worn brake pads or warped rotors.
- Dashboard warning light:Some vehicles have dashboard warning lights that illuminate when brake pad wear reaches a critical level.
Step-by-Step Guide for Inspecting and Replacing Brake Pads:
- Safety first:Park the vehicle on a level surface, engage the parking brake, and chock the wheels to prevent rolling.
- Locate the brake pads:Remove the wheels and locate the brake pads on the brake calipers.
- Inspect the brake pads:Check the thickness of the brake pads. Most pads have wear indicators that will make a squealing noise when the pads are worn down to a certain thickness.
- Replace the brake pads:If the brake pads are worn, replace them with new high-quality brake pads. Ensure the pads are correctly aligned and installed.
- Reassemble the brakes:Reinstall the wheels and tighten the lug nuts to the manufacturer’s specifications.
Importance of Using High-Quality Brake Parts:
Using high-quality brake pads is essential for optimal braking performance and longevity. Cheap or low-quality brake pads may wear out quickly, reduce braking power, and even cause damage to the brake system. Investing in high-quality brake pads ensures reliable and safe braking for your vehicle.
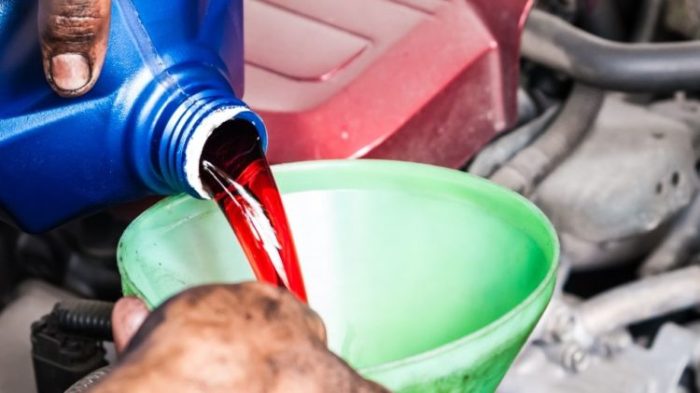
Fluid Changes

Fluids are vital components of your vehicle, responsible for various essential functions. Regularly changing these fluids is crucial for maintaining optimal performance and preventing costly repairs.Understanding the different types of fluids, their specific roles, and the importance of using the correct fluid for each application is essential.
Here’s a comprehensive guide to fluid changes, including tips on how to perform them effectively.
Oil Change
Engine oil lubricates moving parts, reducing friction and wear. It also helps cool the engine and prevent the formation of sludge and deposits. Regular oil changes are necessary to maintain the oil’s viscosity and effectiveness.
- Check your vehicle’s owner’s manual for the recommended oil type and change interval.
- Use a high-quality oil filter to trap contaminants.
- Dispose of used oil responsibly at a recycling center.
Coolant Change
Coolant circulates through the engine and radiator, preventing overheating and protecting against corrosion. Over time, coolant can break down and lose its effectiveness.
Every 30,000 miles you should consider taking your car in for a tune-up. You’ll want to make sure that you’re up-to-date on all of your maintenance, and a tune-up is a great way to keep your car running smoothly. If you’re studying for an unit 1 apes practice test , you’ll want to make sure that you’re prepared for questions about car maintenance.
Every 30,000 miles you should also check your tires, brakes, and fluids.
- Flush the cooling system to remove old coolant and contaminants.
- Use a coolant specifically designed for your vehicle.
- Check the coolant level regularly and top up as needed.
Brake Fluid Change
Brake fluid transfers pressure from the brake pedal to the brake calipers, allowing you to stop your vehicle. It absorbs moisture over time, which can lead to corrosion and reduced braking performance.
- Use a DOT-rated brake fluid that meets the manufacturer’s specifications.
- Flush the brake system to remove old fluid and moisture.
- Check the brake fluid level regularly and top up as needed.
Transmission Fluid Change
Transmission fluid lubricates the gears and components of the transmission, ensuring smooth shifting and preventing wear.
- Use a transmission fluid specifically designed for your vehicle’s transmission type.
- Check the fluid level and condition regularly.
- If the fluid is dark or has a burnt smell, it may need to be changed.
Power Steering Fluid Change
Power steering fluid assists in turning the steering wheel by providing hydraulic pressure to the power steering system.
- Use a power steering fluid specifically designed for your vehicle.
- Check the fluid level and condition regularly.
- If the fluid is low or has a burnt smell, it may need to be changed.
Filter Replacements

Filters play a crucial role in maintaining the health of your vehicle by removing contaminants and debris from various fluids and air. Different types of filters serve specific functions, and their timely replacement is essential for optimal performance and longevity.
Air Filter
The air filter cleans the air entering the engine, removing dust, pollen, and other particles. A clogged air filter can restrict airflow, reducing engine efficiency and increasing fuel consumption. Replace the air filter as recommended in your vehicle’s maintenance schedule, typically every 12,000 to 15,000 miles.
Oil Filter
The oil filter removes contaminants from the engine oil, ensuring it remains clean and free of particles that could cause damage. A clogged oil filter can lead to premature engine wear. Replace the oil filter every time you change the oil, usually every 5,000 to 7,500 miles.
Cabin Filter
The cabin filter purifies the air inside the vehicle, removing dust, pollen, and other allergens. A clean cabin filter improves air quality and reduces the risk of respiratory problems. Replace the cabin filter every 12,000 to 15,000 miles or as recommended by your vehicle’s manufacturer.Using
high-quality filters is essential to ensure their effectiveness. Cheap filters may not provide adequate filtration, compromising the protection of your vehicle and its occupants.
Battery Inspection and Replacement
A car battery is a crucial component that provides the electrical power necessary to start your vehicle and operate its electrical systems. Over time, batteries can weaken or fail, leading to a range of problems. It’s essential to regularly inspect and replace your battery to ensure optimal performance and prevent unexpected breakdowns.
Signs and Symptoms of a Failing Battery
* Difficulty starting the engine, especially in cold weather
- Dimming or flickering headlights and interior lights
- Strange noises or odors coming from the battery
- Corrosion or swelling on the battery terminals
- Reduced battery life, requiring more frequent charging
Battery Inspection and Replacement Procedure
To inspect your battery, visually check for any signs of damage or corrosion. Use a multimeter to test the battery’s voltage; a healthy battery should read around 12.6 volts when the engine is off. If the voltage is significantly lower, it may indicate a failing battery.Replacing
a battery requires some basic tools and safety precautions. Wear gloves and safety glasses, and disconnect the negative terminal first, followed by the positive terminal. Carefully remove the old battery and replace it with a new one of the same size and type.
Reconnect the terminals in the reverse order, tightening them securely.
Importance of Using the Correct Battery
Using the correct battery for your vehicle is essential for optimal performance and longevity. Batteries are designed to meet specific voltage, amperage, and size requirements based on the electrical demands of the vehicle. Installing an incorrect battery can lead to problems such as undercharging, overcharging, or premature failure.
Electrical System Inspection
The electrical system is the backbone of your vehicle, powering everything from the engine to the lights. A properly functioning electrical system is essential for safe and reliable operation. Here’s how to inspect your electrical system and troubleshoot common problems.
Battery Inspection, Every 30000 miles you should
The battery is the heart of the electrical system. It provides the power to start the engine and run the accessories. A weak or dead battery can cause a variety of problems, including difficulty starting the engine, dim lights, and power loss.
To inspect the battery, check the terminals for corrosion and loose connections. The battery should also be tested with a voltmeter to ensure it is holding a charge.
Alternator Inspection
The alternator is responsible for charging the battery and powering the electrical system. A faulty alternator can cause the battery to drain, leading to starting problems and power loss. To inspect the alternator, check the belt for wear and tension.
The alternator should also be tested with a voltmeter to ensure it is producing enough power.
Starter Inspection
The starter is responsible for starting the engine. A faulty starter can make it difficult or impossible to start the engine. To inspect the starter, check the connections for corrosion and loose wires. The starter should also be tested with a voltmeter to ensure it is drawing enough power.
Wiring Inspection
The wiring harness is a complex network of wires that connects the electrical components in the vehicle. A damaged or loose wire can cause a variety of problems, including electrical shorts, power loss, and component failure. To inspect the wiring harness, look for any signs of damage, such as frayed wires or loose connections.
Troubleshooting Electrical Problems
If you are experiencing electrical problems, there are a few things you can do to troubleshoot the issue. First, check the battery terminals for corrosion and loose connections. If the terminals are clean and tight, the next step is to check the fuses and relays.
A blown fuse or relay can cause a loss of power to a specific component or system.If the fuses and relays are all good, the next step is to check the wiring harness. Look for any signs of damage, such as frayed wires or loose connections.
If you find any damaged wires, repair them or replace the affected section of the harness.If you are unable to find the source of the electrical problem, it is best to take your vehicle to a qualified mechanic for diagnosis and repair.
Suspension and Steering Inspection
The suspension and steering systems of a vehicle are crucial for maintaining stability, handling, and comfort while driving. Regular inspections of these components are essential to ensure optimal performance and safety.
Signs of worn suspension and steering components can include:
- Uneven tire wear
- Pulling or drifting to one side while driving
- Bumpy or unstable ride
- Clunking or rattling noises when driving over bumps
- Leaking or damaged shocks or struts
- Excessive play in the steering wheel
To inspect suspension and steering components, follow these steps:
- Visually inspect the tires for uneven wear, bulges, or cracks.
- Check the shocks and struts for leaks or damage.
- Test the steering wheel for excessive play by turning it back and forth while the vehicle is parked.
- Have a mechanic perform a more thorough inspection using specialized equipment.
Using high-quality suspension and steering parts is crucial for maintaining optimal performance and safety. These components are designed to withstand the rigors of everyday driving and provide a comfortable and controlled ride.
Detailed FAQs
How often should I rotate my tires?
Tire rotation is typically recommended every 5,000 to 8,000 miles, or as specified in your vehicle’s owner’s manual.
What are the signs of worn brake pads?
Signs of worn brake pads include squealing or grinding noises when braking, reduced braking performance, and a spongy or soft brake pedal.
How do I check my vehicle’s fluids?
To check your vehicle’s fluids, locate the dipsticks for engine oil, coolant, brake fluid, and transmission fluid. Pull out the dipstick, wipe it clean, reinsert it, and pull it out again to check the fluid level and condition.
